Showing posts with label tutorial. Show all posts

Saturday, September 15, 2012

Photoshop Tutorials (PSE & CS)

I'm re-releasing all the tutorials I've created as .pdf's, in one complete bundle:


Here's what you get:

This is a collection of ten tutorials, written and illustrated for scrappers, photographers, designers, or anybody who needs a good reference set for techniques. I use Photoshop CS+ (not CS6 yet) and some Photoshop elements--the easier techniques are perfectly compatible with Elements; the more advanced ones use tools that Elements does not have. 

These tutorials are easy to understand, very well illustrated with screen shots, and contain all kinds of tips on little things that are often frustrating, including troubleshooting why something didn't work as planned. You can print them out, or follow along onscreen. 

Here's what you'll learn: 

1. Working with Templates: 10 pages, Beginning Level. Learn about some of the basic functions of Photoshop, including simple ways to use layers, clipping masks, basic shadowing, and changing colors. Included: 1 layered .psd template. 

2. Drop Shadow Basics: 7 pages, Beginning Level. Learn how to use the special effects dialog to give your layouts depth and realism. 

3. Extraction with the Magnetic Lasso: 7 pages, Beginning Level. Learn how to remove certain types of elements from their backgrounds in a relatively painless manner. 

4. Changing Colors: 7 pages, Beginning Level. Learn how to change the colors of your embellishments or papers. 

5. Making Simple Papers: 9 pages, Beginning Level. Learn how to make your own simple dotted or striped papers. Included: 2 sample 12x12", 300 dpi. papers. 

6. More on Drop Shadows: 11 pages, Intermediate Level. Learn how to make more complex shadows by actually manipulating the shadow itself. 

7. Introduction to Masks: 13 pages, Intermediate Level. Learn how quick masks and channel masks work, as well as how to extract using these methods. CS only. 

8. More on Masks: Layer Masks: 11 pages, Intermediate Level. Learn how to approach gradient blending, spot retouching, and easy recoloring. CS only. 

9. Making (and Using) Brushes: 11 pages, Intermediate Level. Learn how to make brushes from photos, how to change brushes, and how to save them. 

10. Extraction with the Pen Tool: 12 pages, Advanced Level. Learn how to use the pen tool effectively to extract complex shapes from a photograph. CS only.


Here's a screenshot from the Making Simple Papers tutorial, for example:


And here's what Ona made using the tutorials (with my Once Upon A Time kit):


It's a great deal, and even if you've been scrapping a while you can still find out some cool tricks! Most of the skills are interchangeable between programs (Gimp, PaintShopPro, etc.)--as long as you're using the same tools, they all function pretty much the same. 20% off this weekend, so it's a good deal!

Tuesday, March 1, 2011

How to recolor brushes when they're not .abr files

Anne Hargreaves asked, in her comment to Hey! It's Tuesday!:
How have you coloured them? I could do it if they were brushes - I'm sure I'm missing something obvious!
Hi Anne! The kind of brushes that I make usually are transparent .png files, instead of the typical .abr file (which are commonly called brushes) you might find. Mostly I don't bundle them as .abr, because many of my brushes take up a full 12x12" page (3600 pixels to a side), and the maximum size for a Photoshop brush is 2500 pixels. However, recoloring them is a breeze!

There are many ways to do this.

Simplest: Open the file, and change the color fill by choosing the color you want as your foreground color, then pressing shift+alt+backspace (for Photoshop CS & PSE).

Second: change the color by locking the transparency on the brush layer (in your layers palette window up at the top, to the right of "Lock", click on the little box with gray & white squares), then simply painting over it. This is particularly nice when you use the clone tool and pick up specific parts of a photograph to paint with.

Third: Use an adjustment color fill layer. Click on the little gray/white circle in the layers palette window, and choose "Color." Pick your color when the dialog box comes up, then clip this layer to the brush layer (ctrl+alt+g in CS+, ctrl+g in PSE). The nice thing about this option is that you can change the blending mode on the color layer, as well as on the brush layer, so you can achieve some really intricate coloring. (Note: you can also use the Layer-->New Fill Layer-->Color command from the menu at the top of your screen to do this).

Fourth: Clip a photograph or paper to the brush by using the ctrl+alt+g (CS) or ctrl+g (PSE) command.

Those are the 4 most basic options I can think of at the moment to help you use the brushes that I often include in my kits or as element packs. They are a TON of fun!

Thursday, March 25, 2010

Tutorials and Marbled Papers!

I've finally gotten my act together to start rewriting my tutorials--I've now got two of them for sale at The Digichick:

Basic Templates (teaches you a bunch of basic maneuvers and includes a template):


Basic Drop Shadows (VERY basic, but goes through the main options in PSE & CS+):


And finally, a sweet paper pack with cool marbled papers and an assorted set of Kraft papers:


And as usual, I've been spoiled by my CT!

From Lorell:


From Julie:


From Karen:


And from Jenny:


Have a wonderful weekend!

Thursday, September 17, 2009

Fasteners! Bling! Brushes!

All that coming out today @ Pixel Canvas:

Fastened 1:
Heather T., Fastened 1

Ooh, Shiny! 2:
Heather T., Ooh, Shiny! 2

and 254-Making (And Using) Brushes:
Heather T., 254 - Making (And Using) Brushes

And here's a layout for you too:


What a goof, eh? I think he'd be totally chagrined to know that the FINEtakeaphotoifyouhaveto expression turned out rather cute! *giggles*

For the Friday lift, inspired (loosely) by DolceVita's Inspiration.

Everything mine: Paper from Urbanhood, with a couple of masks, one of which is from the Delicacies kit, as is the spray of dried petals. Staples & duct tape from Fastened 1; pin from Fall Whispers, and feather from EcoFabulous (retired). Stitches from Stitched 1.

Thursday, May 21, 2009

Another Freebie & A New Tutorial

So, besides my new kit By The Sea, a more extensive tutorial on drop shadows is out too:

Heather T., More On Drop Shadows

And finally, freebie alert! No longer Available at Pixel Canvas, 3 variations on a Love Bird (sorry!):

Heather Taylor, Freebie: Love Bird

Go forth and have a most creative weekend!! =)

Thursday, April 9, 2009

New Tutorial in the Shop: Advanced Extractions With The Pen Tool

Man, this one took a looooooooong time to put together, but I hope it will help everybody lose their fear of the pen in Photoshop. It's such a handy little tool... =)


And here's the layout that came out of that:

Heather Taylor, Love

Love is pretty much the guiding principle in our family. Love encourages respect and civility; love provides a path through the tangles of anger and frustration; love frees us and gives us comfort. This page grew into the representation of those concepts as I created it...

Credits: Everything by Vinnie Pearce, Pixel Canvas. Layered background and hills from He's Royalty. Feathery trees, and feather in the sky, from Paint Splatter Shapes - Overlays 01. Lollipop tree from Sakura Sanctuary. Feather and word art from Romance Me. Lighthouse and boat from Birthday Boy - Sea. Hearts in the sky from Young Beauty.

Saturday, April 4, 2009

A Sudden Drop of Wisdom (and a layout or two)

"We gather notions together from the narrow environment in which we personally have lived and store them up in our heads. And then we bind the spirit and the actions of ourselves and our families, our friends and our lovers, with those standards."

From an interview with Chikabo Kumada, a pioneer of botanical drawing from Japan. I really enjoyed the first part of his interview featured at PingMag (sadly now defunct); the 2nd part comes from the new website with some of the same people, Nipponscape.

All that to say that after 97 years, this artist is also a wonderful philosopher...

And now onto some layouts:

"You Are My Laughter"

Heather Taylor, You Are My Laughter

My sister's son, being awfully cute... Monkey button by Traci Murphy Designs, Flossit Element Pack. Everything else by Heather T. @ Get Digi With It: Frame from Chinoiserie, Word art from "You Are My..." Wordart pack, flower & color splat from "Innocent Surprise."

"You Learn Everywhere"

Heather Taylor, You Learn Everywhere

For the April 3 lift challenge at Pixel Canvas: Lift of Osaru (Yoshiko)'s "My 7-5-3".

Credits: Everything by Vinnie Pearce at Pixel Canvas. Background photo is textured with a paper from Safari Street. White swirl is from Paint Spatter Shapes, black swirl is from Decorative Grunge Frames Set 01. "You" wordart from Decorative Page Prompts Set 01, "learn" is from Woodlands Park - Boys. The Distress Brush Set 01 is in use everywhere. Fonts: Schol Broadway and Telegraphem. Pictures taken at Gasworks Park in Seattle, an old gas/energy company that's now been turned into a public park.


"OMSI"

Heather Taylor, OMSI

Boy did we spend a long time in that place--but we had fun hanging out with friends of ours and their new baby! Credits: Everything by Erica Hernandez, at 2Peas, from her Isabella Mini-Kit. Fonts: Adelaide & Telegraphem.

And finally, a layout that I created to go with my tutorial on using templates at Pixel Canvas, "A New City Every Day":

Heather Taylor, A New City Every Day

Credits: Everything by Vinnie Pearce, Pixel Canvas. Template from Give Me Simple - Template Pack 2. Background paper from The Tea Party. Background paper for small box from Moments of Special Freebie, as well as the little heart on the title. Text paper from The Art Corner Paper Pack 01. Sea star charm from Paradiso. Border on the small box from Woodlands Park - Boys. Fonts: Undo 35, 1942 Report, and Schrift. Journaling reads: "Every day, we try to go to the beach, and every day, you get lost in the possibilities of sand."

Have a great weekend!

Tuesday, March 31, 2009

Tutorials at Pixel Canvas -- Eeks!

By me!!! *grins* I'm so excited and honored to be able to do this... You can find them all here, at Pixel Canvas, under the Tutorial heading (what a surprise ;)!

Heather Taylor, Simple Extractions Tutorial

Wednesday, December 3, 2008

Chance Discovery: Tinting

You can change the color of a photograph in several ways, notably with the hue/shift sliders, or the selective color sliders. If you want the whole photo to be in shades and tints of the same color, you first desaturate it (make it black and white, but keep the RGB mode--instead of turning it into a grayscale image), then fiddle with the hue/shift sliders. But that doesn't quite get it, as all your blacks shift color--if you want a really light color the blacks become really light too.

HowEVER, if you keep your color photograph and add an adjustment layer (the little half black, half white icon at the bottom of the layers palette) of "Solid Color", pick your color, then set that layer's blending mode to "Color" as well... ta dah!! Now you've got a tinted photo, versus a colorized black and white. The contrast values are still really sharp, *and* you've got color everywhere you want! KEWL!

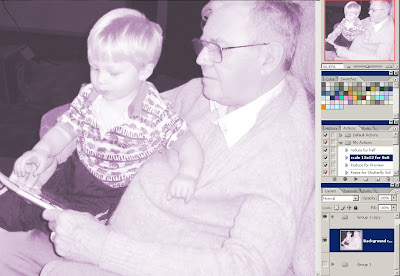
Here are two screen shots:

Desaturated, then recolored (click the "colorize" box) with Image-->Adjust-->Hue/Saturation (click on image to see more fully):

Heather Taylor, Tinting with Hue/Saturation slider

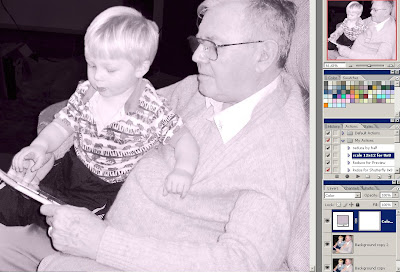
And now with the Color adjustment layer set to color blending mode:

Heather Taylor, Tinting with color adjustment layer set to color mode

The difference is really noticeable in Allen's pants, for example. I remember being bummed last year when Stef talked about being able to do this easily in CS3--in CS2 there's no explicit option for this. So, yay!

Saturday, November 15, 2008

Tutorial: Fading Backgrounds

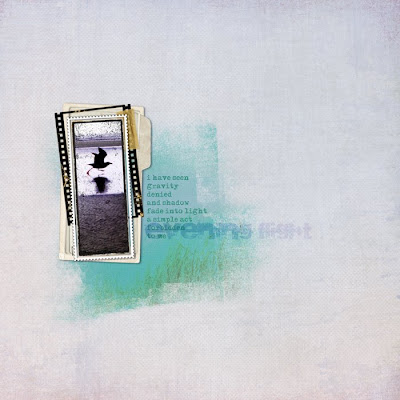
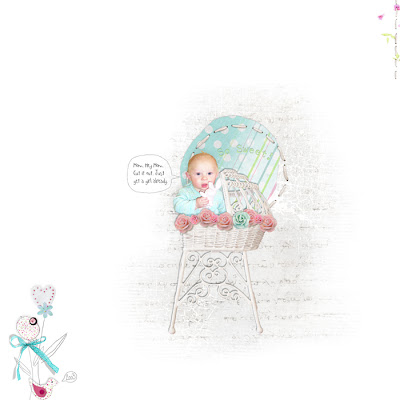
This is such an easy technique: take one paper, and fade it into the other. This gives you the chance to introduce some subtle variations into your background, without having to go full out into making something look realistic, and it's great for a soft touch of color if you want it. Here are a couple of examples:

Heather Taylor, Evening Flight

Credits: All Designer Digitals. Papers by Lynn Grieveson: Background from Essential Bases, and blended portion from Catalina (using Anna Aspnes's Fruehling mask). All frames by Katie Pertiet: From the bottom up: Carded Stacked Frames, Filmed Layered Template No. 10 (tape is from this as well), Photobooth Frame No. 2 Sampler, and Little One Layered Template. Fonts: Maszyna Plus and Sidewalk. Journaling reads: "i have seen / gravity / denied / and shadow / fade into / light / a simple act / forbidden / to me"

Heather Taylor, So Sweet

Oh, what I have to resort to to use these pretty feminine kits! *lol* Everything from Vinnie Pearce's new kit at Pixel Canvas, Shabby Baby.

So, how do you do this? First, you need a mask. A mask is simply a shape, which you will use as a "clipping path"--that is, the image will be mapped directly onto the shape, including it's opacity! It's way cool. =) I used Anna Aspnes's mask in the first layout, but they're really easy to make. Open up a blank canvas, and on a transparent layer, just start painting. You can use a big clunky brush for the middle, but the cooler effect will be given by the edges that fade into nothingness, so make the edges gradually lighter and lighter. I usually start by painting, and then erase a bunch, then paint again... Try using brushes that you've made from scans of some text (it doesn't matter what as it'll be illegible)--those make really nice fine texture.

Once you have your mask all set, place your background paper on a layer beneath it. Then, take a slightly contrasting paper, and place it on a layer *above* the mask. Now, do ctrl+alt+g (in PSE, I think it's just ctrl+g). The top paper will map itself onto the mask, and if you've faded your edges enough, it will gently settle over top the background and give you a nice color spot. Have fun!